Version #1
Review
|
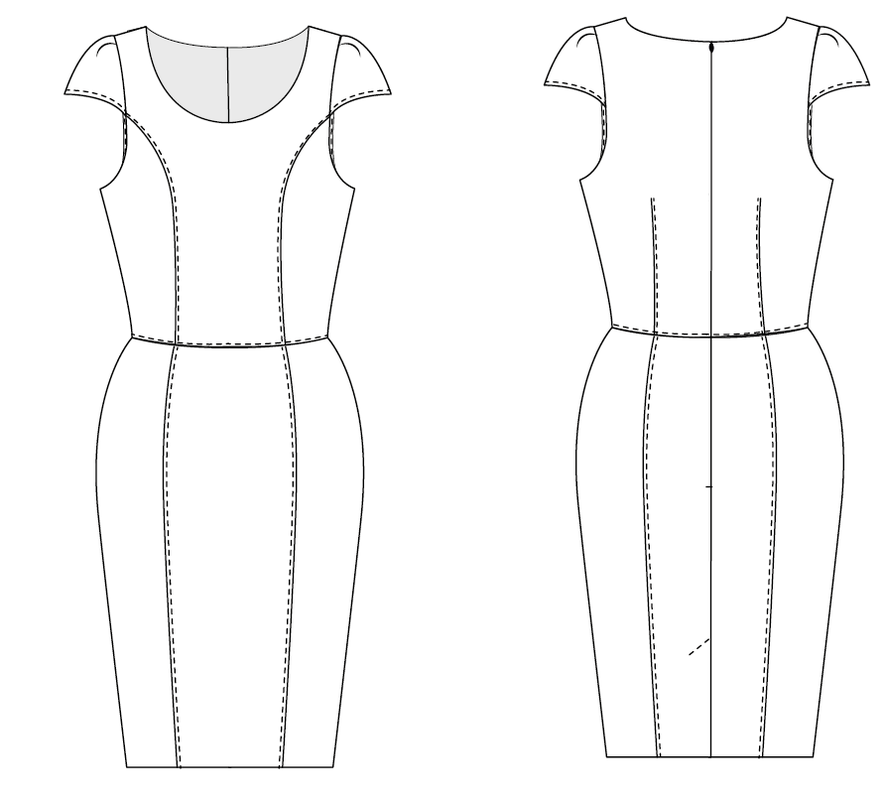
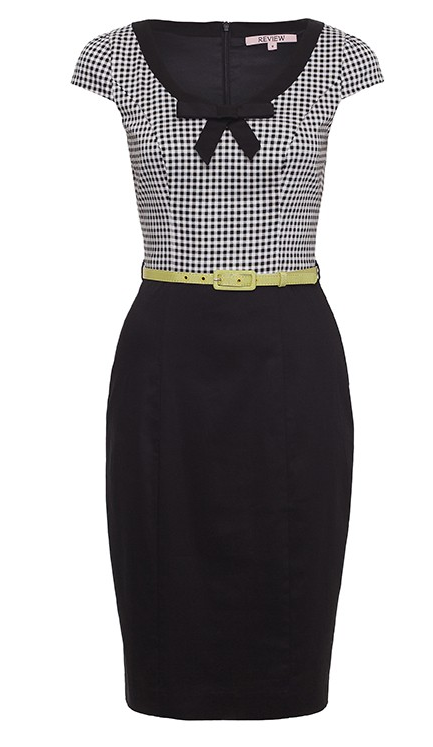
Version #1 - Straight panelled skirt with scoop front neckline and pleated cap sleeves.
|
What You'll Achieve In This Module
- how to alter your Sleeveless Bodice pattern to a Scoop front neck.
- how to alter your Basic Skirt pattern to a Straight Panelled Skirt.
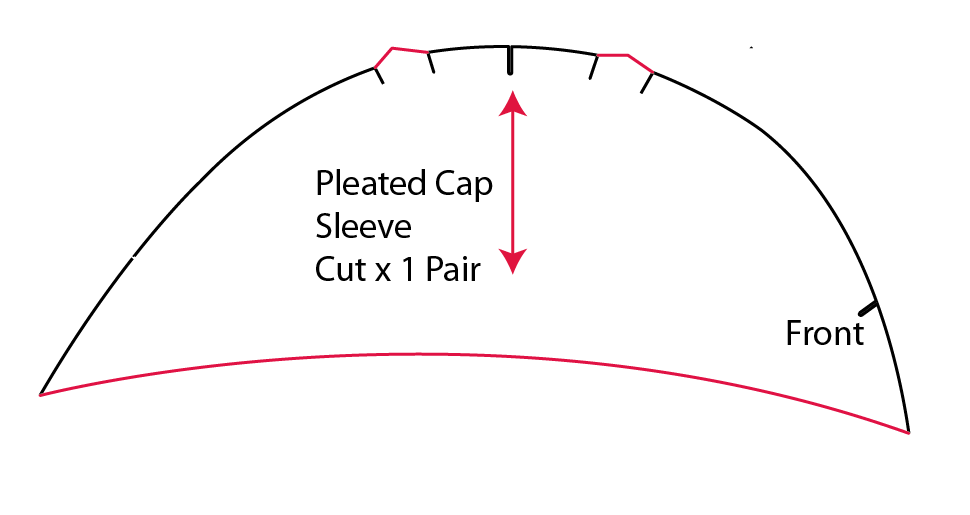
- alter your sleeve pattern to make a pleated cap sleeve.
Altering Your Bodice Pattern For Version 1
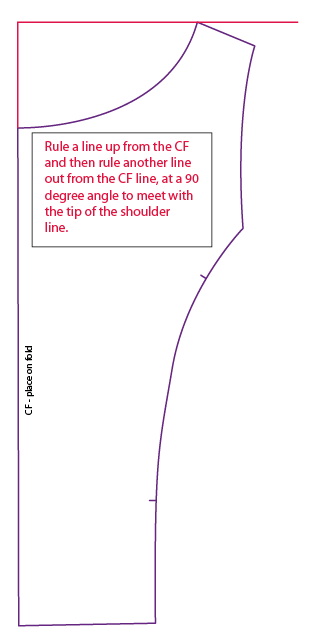
1. Make a copy of all your Bodice and Skirt Patterns before
you proceed. 2. Rule a line up from the CF and then rule another line out from the CF line, at a 90 degree angle, to meet with the tip of the shoulder line. |
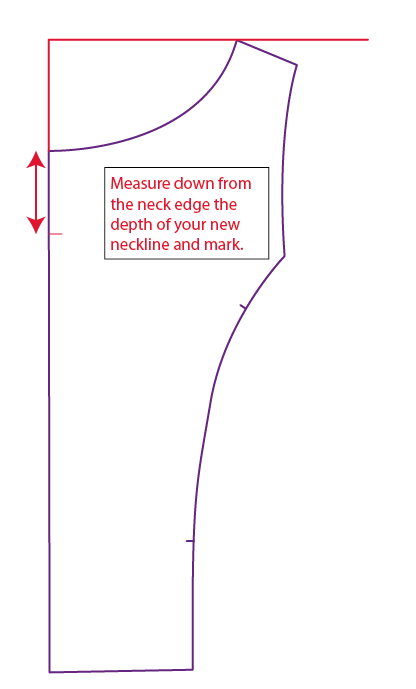
3. You need to find the measurement for your Scoop Neckline depth.
Measure down, on yourself, from the hollow in your front neck to the desired depth you'd like. Then transfer this measurement to your CF bodice pattern. My measurement was: 10cm | 4" for the depth of the neckline and 2.5cm | 1" in on the shoulder line. |
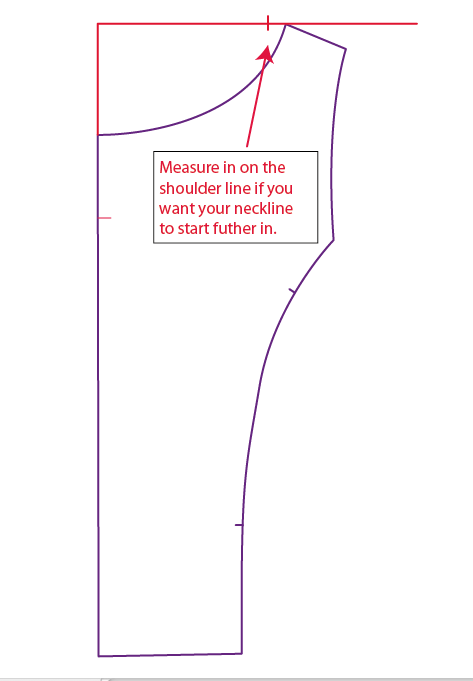
4. This Step is totally Optional.
I measured out from the shoulder line point 2.5cm | 1" as I wanted my neckline to be smaller. Then I made a mark. |
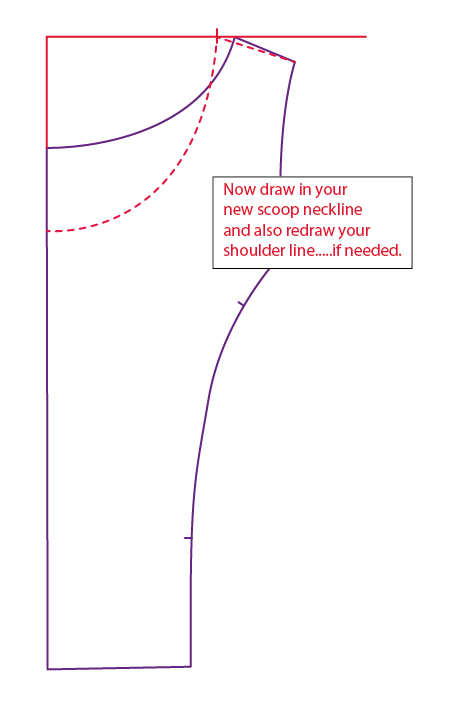
5. Now draw in your new scoop neckline and redraw your shoulder line if needed.
|
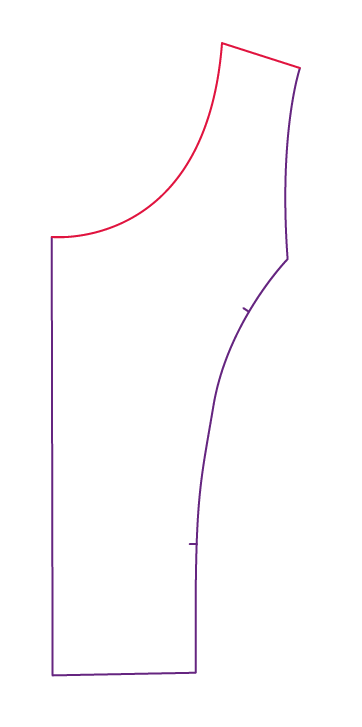
6. This is now my new Scoop neckline. Yours will be similar.
|
IMPORTANT NOTE: Whatever you do to the FRONT SHOULDER LINE you need to do that to the back shoulder line.
|
NOTE: Once you have made your Toile and ok with the neckline you will then need to add 6mm | 1/4" seam allowance and also make your facing.....but I will show you that after the fitting stage.
Altering Your Front Skirt Pattern

1. Make sure you have made a copy of your altered skirt pattern front and back.
Don't worry too much about drawing the dart in on the front and back as you are going to get rid of the dart when you alter your skirt pattern. But, please keep the your skirt pattern handy as you will need the measurements of the dart. |
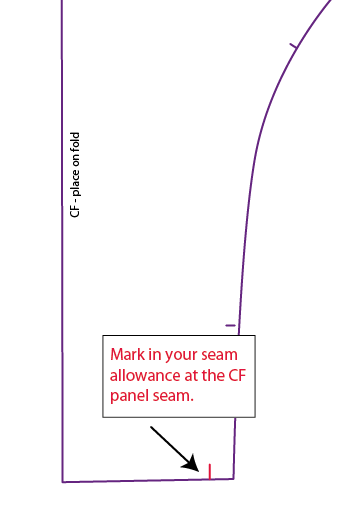
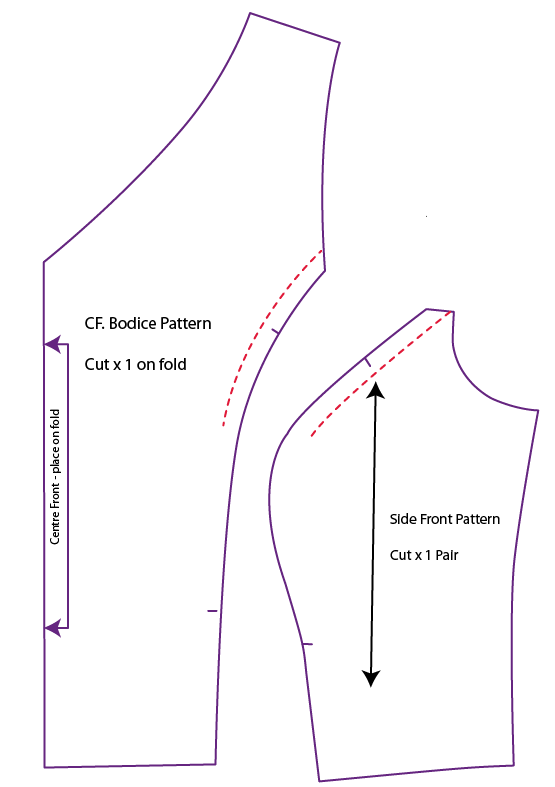
2. Go back to your CF Bodice Panel that you just altered and mark in a 1cm | 3/8" seam allowance.
|

3. Now measure from the CF line out to the seam allowance mark.
|
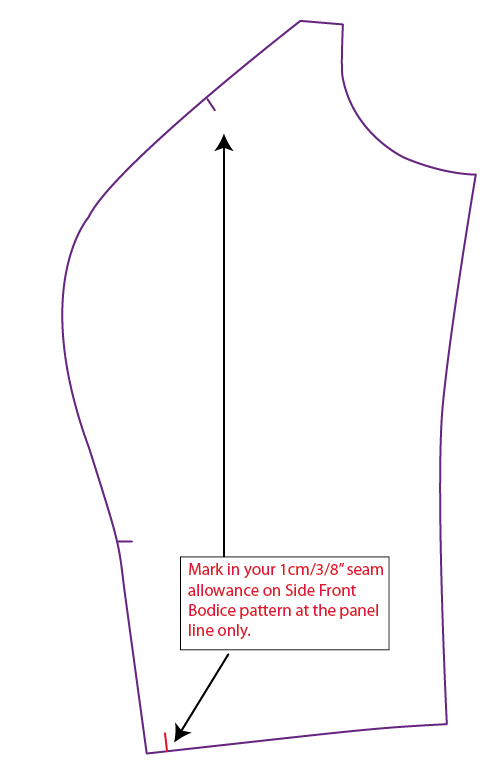
5. Now go back to your Side Front Bodice pattern and mark in 1cm | 3/8" seam allowance only on the panel seam.
|
|
|
|
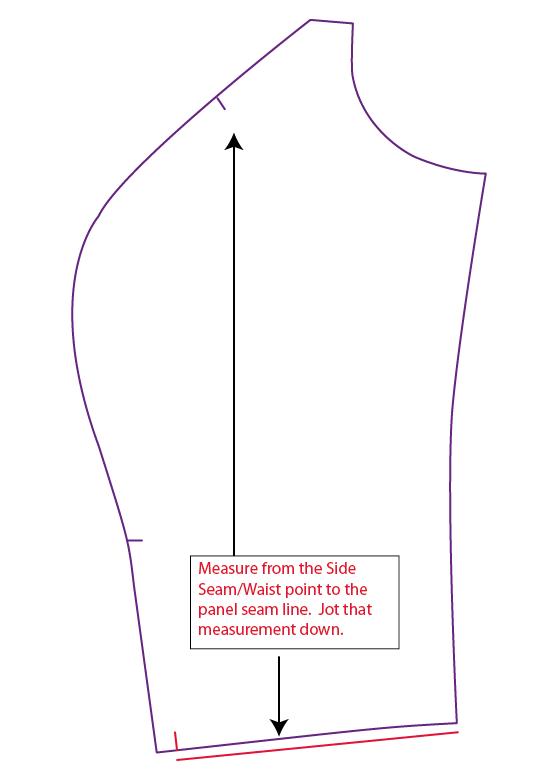
6. Now measure from the side seam into the seam allowance mark.
|
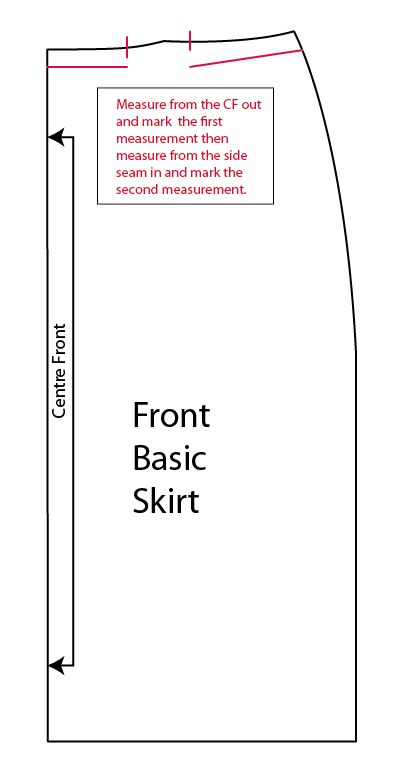
7. Now transfer those measurements to your skirt waist line. Measure from the side seam in and make a mark.
|

8. Find the middle of the two marks and make another mark. Measure out from the CF to the new mark and jot down that amount.
|
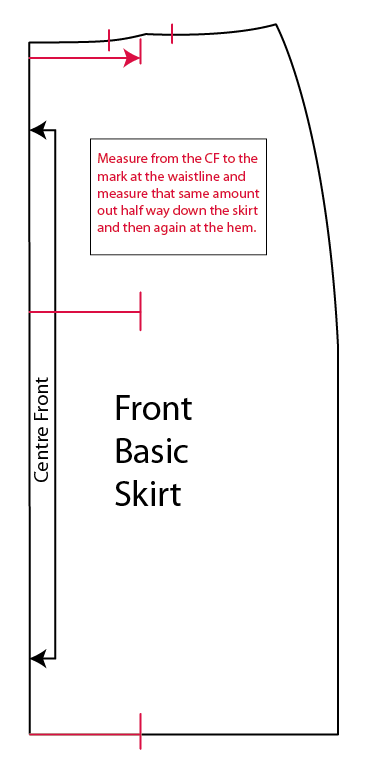
9. Transfer the measurement you recorded to half way down the skirt and at the hem and mark.
|
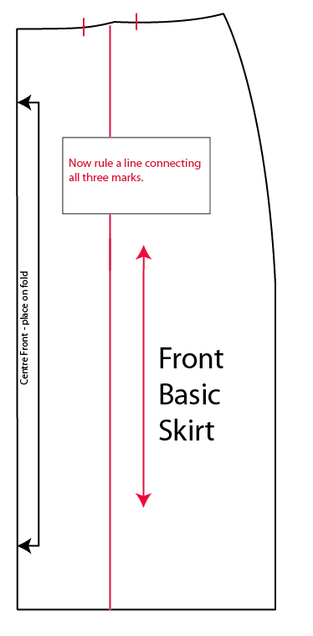
10. Rule a line from the waist to the hem connecting the three marks. This will now be the panel line.
NOTE: Mark in your grain line to the Side Front Panel. |

11. Measure down the the waist at the CF 26.5cm | 10.5" and rule a line out to the side seam at a 90 degree angle.
12. Measure down from the waist at the panel line 8cm | 3" and mark. |
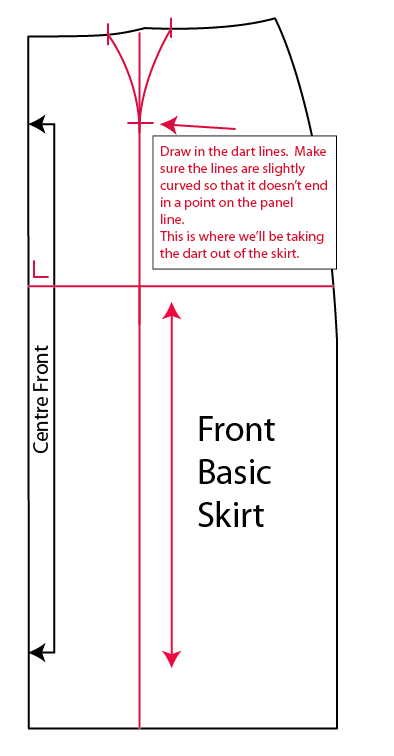
13. Draw in the dart lines making sure the lines are slightly cured so that it doesn't end in a point on the panel line.
NOTE: The red line at the hip will be notches in the next photo. Make sure you do the same on your pattern. |

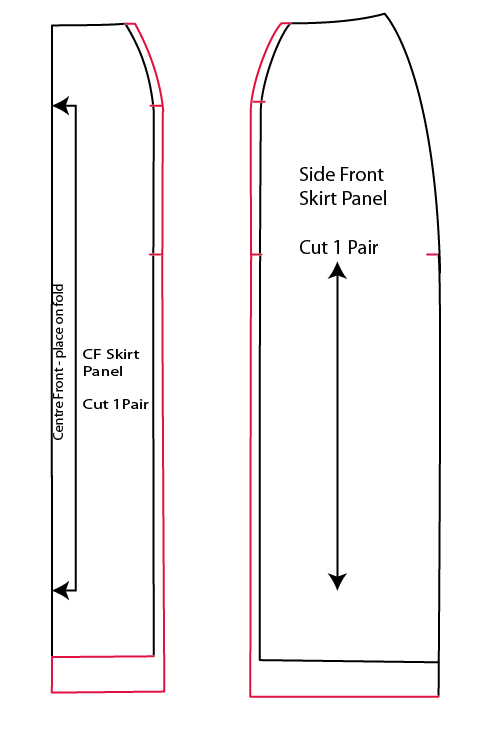
14. Now cut on the panel line and cut away the darts.
Make sure the red notches are still in place at the dart point and the hip line. |
|

IMPORTANT POINTS TO NOTE:
|
Altering Your Back Skirt Pattern
You are going to be doing the exact same alterations to the back skirt as your did to the front.
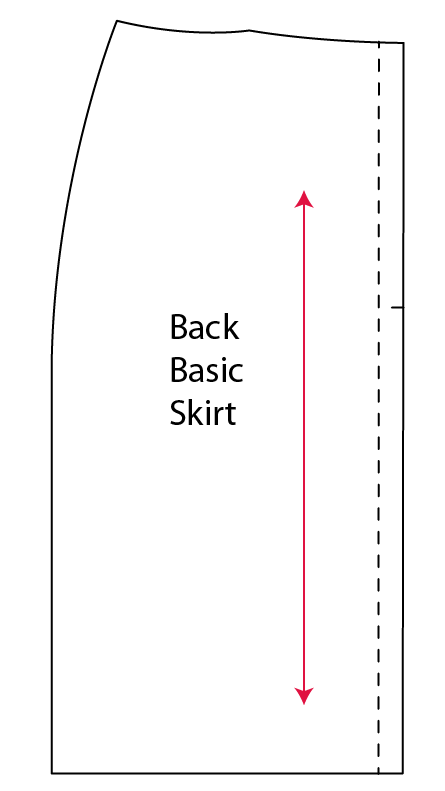
1. Make sure you take a copy of your back skirt. Please don't use the original skirt.
|
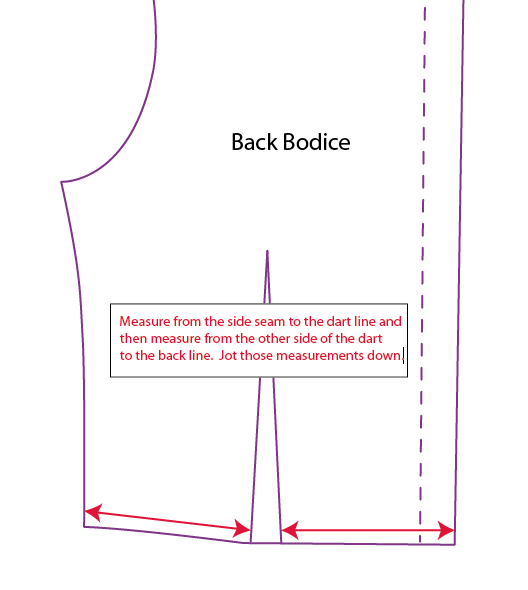
2. Measure on your back bodice pattern from the side seam to the first dart line then from the second dart line to the back line. Jot down the amounts.
|
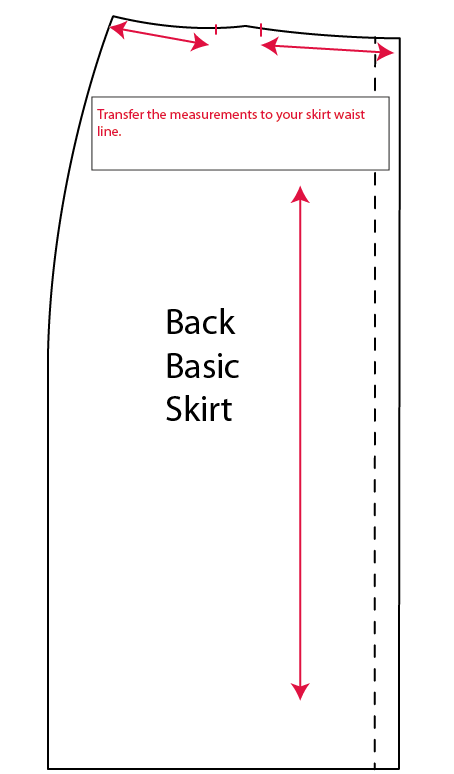
3. Transfer those amounts to the back skirt just like you did on the front skirt.
|
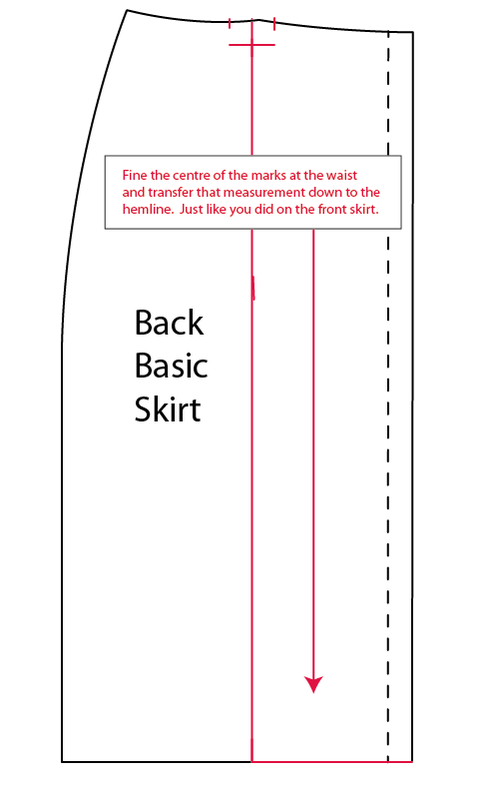
4. Find the centre of the dart marks and transfer that measurement from the back line out down the skirt at the hip and the hemline. Then connect the marks ruling a line from the hem to the waist.
|
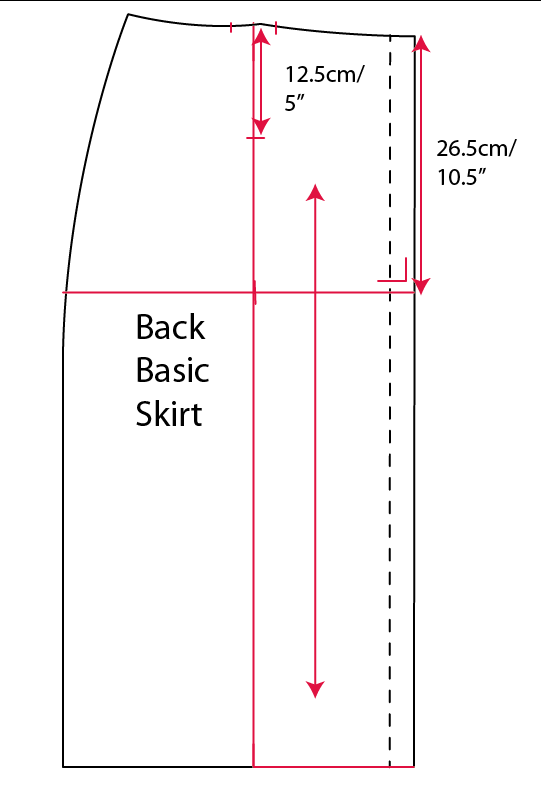
5. Measure down 26.5cm | 10.5" at the back line and rule out another line at a 90 degree angle. Then measure down 12.5cm | 5" down the panel line and mark that point.
|
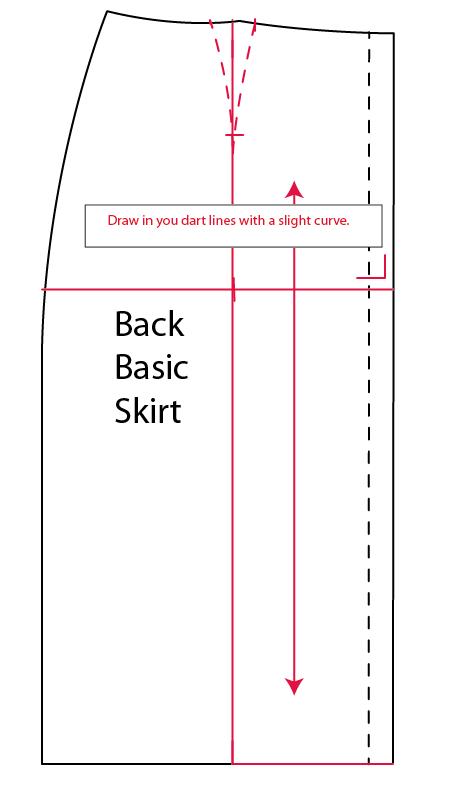
6. Draw in the dart lines with a slight curve.
|
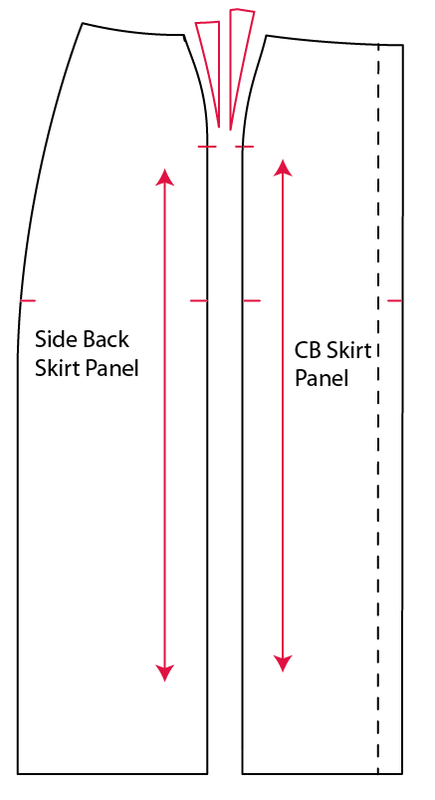
7. Before you cut your panel line make sure you have marked your new grain line on the side back skirt panel. Notice the horizontal line 26.5cm | 10.5" down have now been turned into notches for the new flare panel line to start from.
|
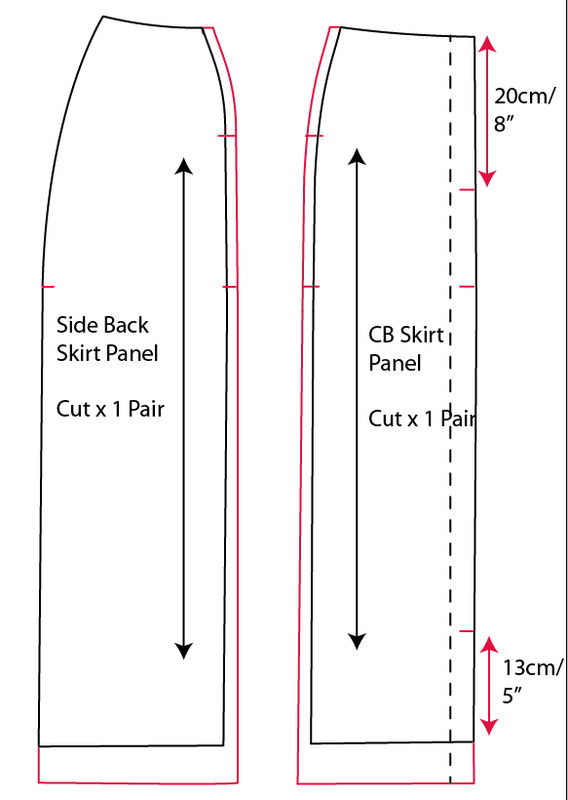
8. Your back skirt is completed all your need to do is add 1cm seam allowance to the panel lines and 5cm | 2" hem.
You may need a back split or vent. If so meaure up 13cm | 5" from the hem. |
IMPORTANT NOTE: Like the front, make sure that you've marked all your notches, grain lines and your pattern information. Make sure your zip opening is 20cm | 8" from the waistline.
Altering Your Sleeve Pattern
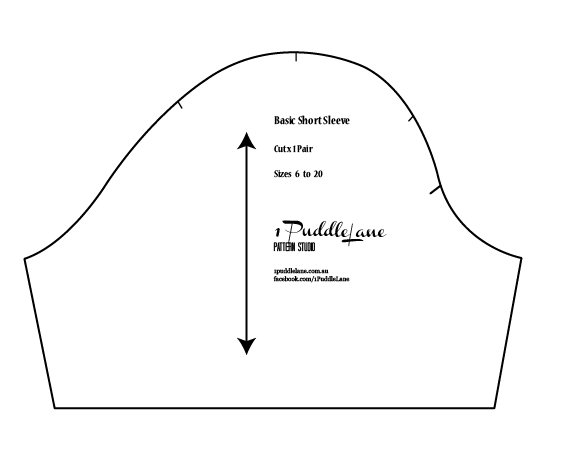
1. Make a copy of your basic sleeve pattern. Make sure you have all notches and the gain line on the pattern.
|
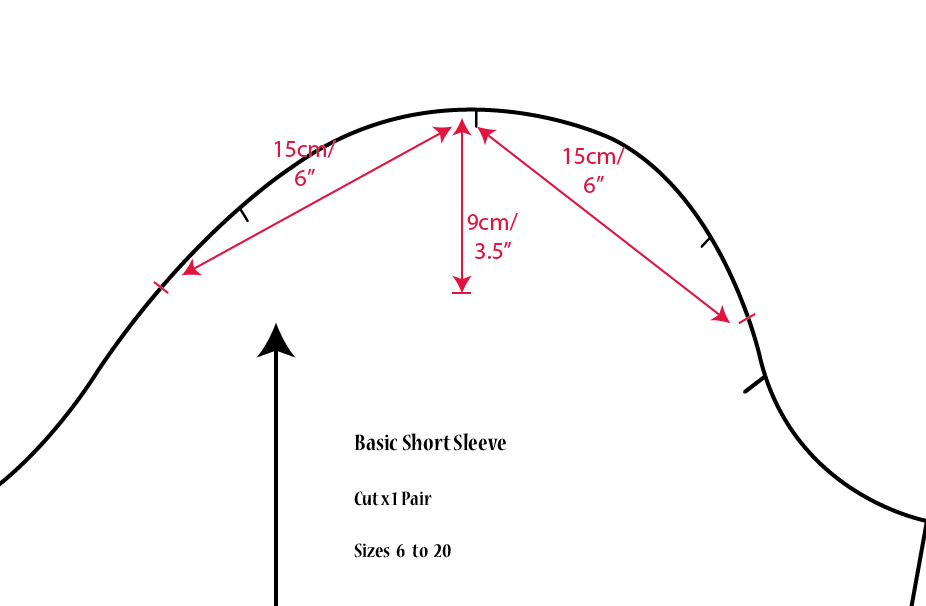
2. Measure down from the centre notch - 9cm | 3.5" and mark.
Measure either side of the centre notch - 15cm | 6" and mark. |
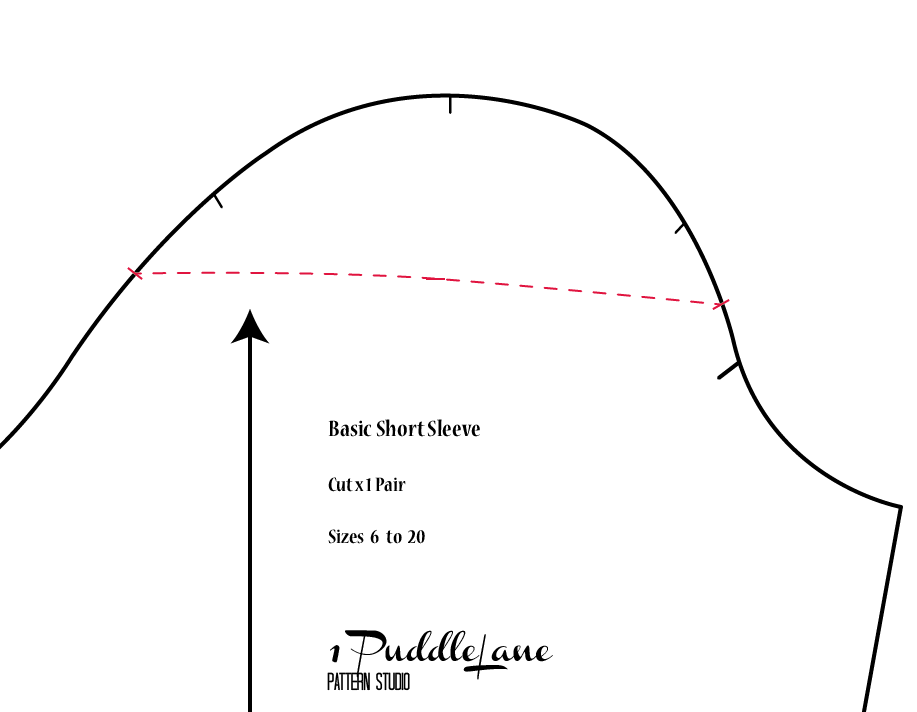
3. Draw a line to connect those points. It will probably be almost straight.
|
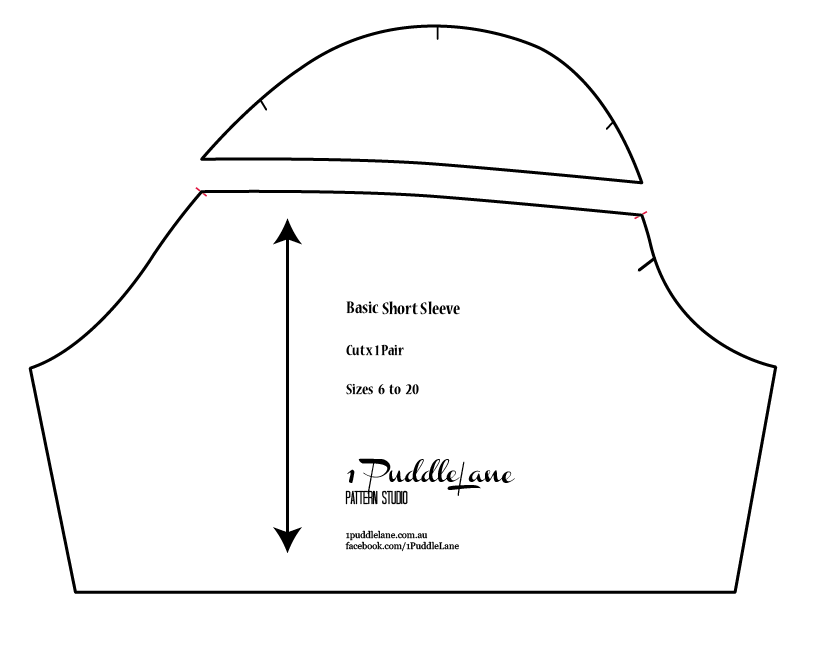
4. Cut at that line and make sure you transfer the grain line to the cap sleeve.
|
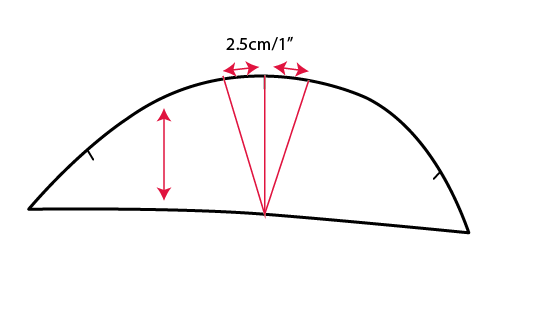
5. The centre line which connects with the centre notch will be your grain line. Now measure either side of the centre line 2.5cm | 1" and rule a line down to the bottom of the cap sleeve at the centre line.
|
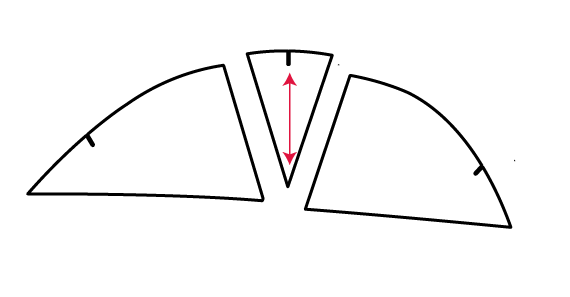
6. Now cut these two lines. Your pattern should now look like this.
|
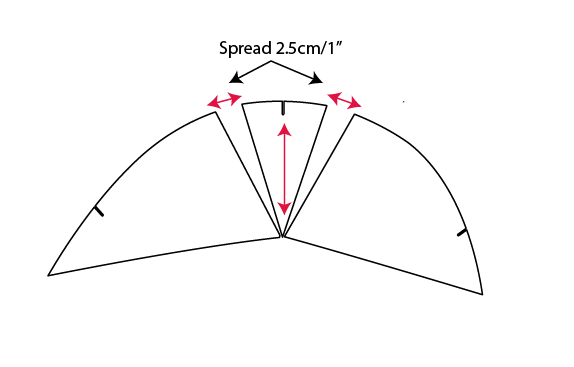
7. Spread on the top of the cap sleeve 2.5cm 1". Your pattern will look like this. These will for your pleats.
|
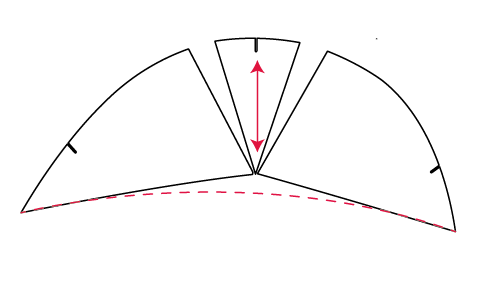
8. Now re-draw your hem line on the sleeve so that it's more rounded and less of a peak.
|
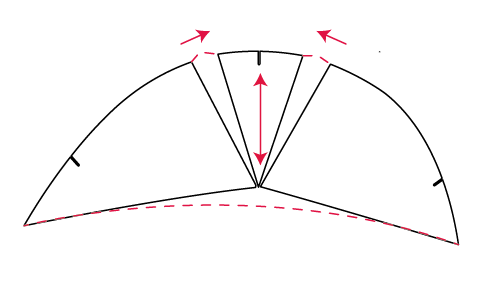
9. Fold the pleats in toward the centre and with your tracing wheel run over the edge of the sleeve to form the edge of the pleat.
|
10. Mark the to of the pleats in the direction the lines where going. This ensure that the pleats will go in that direction once they are folded in.
|
Sewing Your Dress to Fitting Stage
Before you start cutting out your dress make sure the following:
I know making a Toile first can be a bit of a pain in the butt - but, I'll let you in on a little secret. All the fashion designers make Toile after Toile before they are finally happy with their sample then they get their pattern ready to mass produce or make short runs.
So you're not alone in this process AND you'll guarantee that you won't mess up that $30/metre fabric that you've bought for that special occasion.
Well then, have I convinced you that it really is a necessary step to sew up your Toile first? Yes? Fantastic, then let's get going.
NOTE: Always make sure you sew your Toile in fabric similar to the fabric you'll be using. Eg. If you are making a dress out of Cotton Drill then I would use Calico or a cheap Cotton Drill for your sample. If you are making your dress out of Cotton Voile then sew your Toile in a cheap lawn and so on.
- side seams match
- notch points match
I know making a Toile first can be a bit of a pain in the butt - but, I'll let you in on a little secret. All the fashion designers make Toile after Toile before they are finally happy with their sample then they get their pattern ready to mass produce or make short runs.
So you're not alone in this process AND you'll guarantee that you won't mess up that $30/metre fabric that you've bought for that special occasion.
Well then, have I convinced you that it really is a necessary step to sew up your Toile first? Yes? Fantastic, then let's get going.
NOTE: Always make sure you sew your Toile in fabric similar to the fabric you'll be using. Eg. If you are making a dress out of Cotton Drill then I would use Calico or a cheap Cotton Drill for your sample. If you are making your dress out of Cotton Voile then sew your Toile in a cheap lawn and so on.
Method for Sewing Version #1
BODICE
1. Sew a stay stitch around the front and back necklines to prevent stretching.
2. Sew your side front bodice panels to your CF bodice piece with right sides facing.
Press to the CF.
2. Sew your side front bodice panels to your CF bodice piece with right sides facing.
Press to the CF.
3. Sew your back darts.
Press to the side seam.
Press to the side seam.
4. Now sew your side and shoulder seams and press open.
SLEEVES
5. Fold the pleats in toward the centre on your cap sleeve.
6. Using the centre notch match it with the shoulder seam of the armhole and pin. Now pin the rest of the cap sleeve in.
5. Fold the pleats in toward the centre on your cap sleeve.
6. Using the centre notch match it with the shoulder seam of the armhole and pin. Now pin the rest of the cap sleeve in.
SKIRT
7. Pin and sew your Side Front skirt panels to your CF skirt panel. Make sure you match up the notches.
Now repeat this step to the back. Leave the back seam open.
Press to the CF.
8. Pin and sew your skirt side seams with right sides together.
Press seams to the back.
Now repeat this step to the back. Leave the back seam open.
Press to the CF.
8. Pin and sew your skirt side seams with right sides together.
Press seams to the back.
9. Attach the skirt waist and bodice waist together with right side together. Make sure you are matching up all the panel seams and side seams.
Press seam up.
Press seam up.
10. Now the back skirt CB seam needs to be sewn to the zip notch.
NOTE: MAKE SURE YOU HAVE THE WRONG SIDES TOGETHER. This will help with fitting the dress.
Now you are ready to fit!
NOTE: MAKE SURE YOU HAVE THE WRONG SIDES TOGETHER. This will help with fitting the dress.
Now you are ready to fit!
Fitting Version #1 Toile
Here's what my lovely tester, Abbie, did for her Version #1 Toile.
Making Your Neck Facings
Once you have perfected your style and want to get going on the real thing - it's time to make the front and back neck facing and add seam allowance to the neckline.
1. On your CF and Side Front Bodice pattern mark the 1cm | 3/8" seam allowance to the top of the panel down to about 5cm | 2" past the top notch.
|
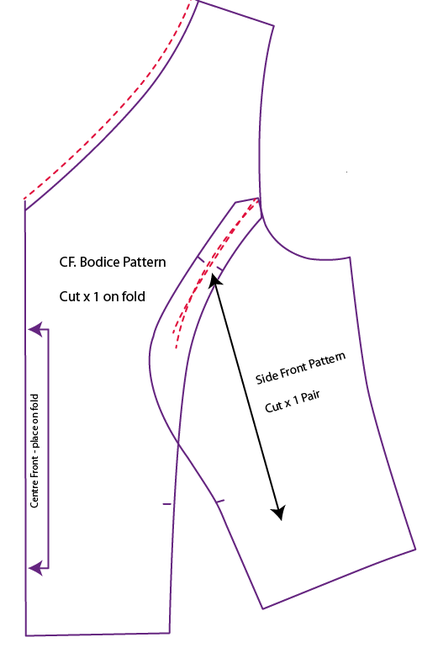
2. Now lay the Side Front panel over the CF panel and match the seams. Also now is the time to add 1cm | 3/8" seam allowance to the V neckline.
|
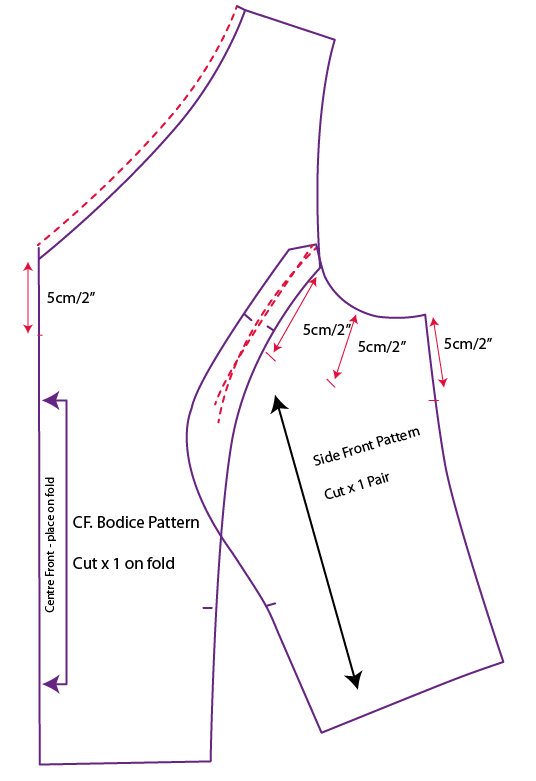
3. Measure down 5cm | 2" at the CF, side seam and the armhole of the side panel and mark.
|
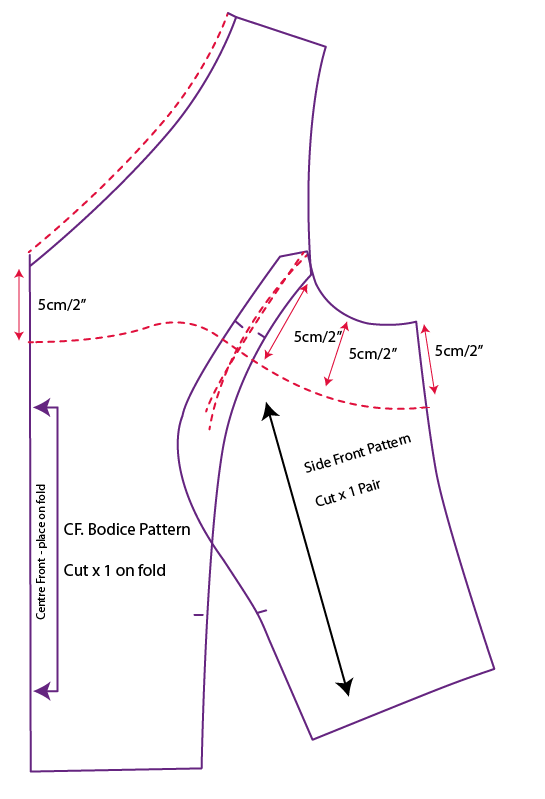
4. Next you need to connect these marks drawing a smooth curved line like the one above. This will become your facing. With the tracing wheel tracing around your facing.
|

|
|
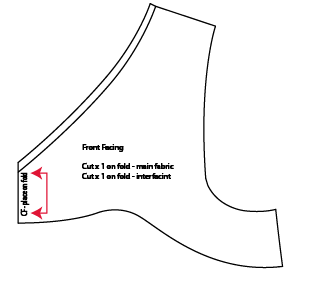
This is what your Front neck/armhole facing will look like.

CREATE 5 STYLES WITH 1 PATTERN!
BONUS #1 - Choosing Your Shape
BONUS #2 - Choosing Your Colours
BONUS #3 - Choosing The Right Fabric For Your Dress
BONUS #4 - BOOKING 2 SKYPE CALLS WITH ME
- WELCOME!
- MODULE 1 - Making Your Sleeveless Bodice Toile
- MODULE 2 - Making Your Short Sleeve Bodice Toile
- MODULE 3 - Making Your Skirt Toile
- MODULE 4 - 5 Styles
BONUS #1 - Choosing Your Shape
BONUS #2 - Choosing Your Colours
BONUS #3 - Choosing The Right Fabric For Your Dress
BONUS #4 - BOOKING 2 SKYPE CALLS WITH ME
