Lesson 1 -
How To Measure Yourself Correctly & Cut & Sew Your Toile
Your first Lesson today will be the most IMPORTANT Lesson of the MiSS FOX DRESS SEW-A-LONG. You need to take particular care and accuracy when you are measuring yourself as that determines a good fit for the bodice and ultimately a fantastic fitting dress at the end.
And it's fine if you make more than one Calico Toile. It's better to be sure than cut into that gorgeous fabric that you've spent an arm and a leg and it's not correct.
Also, try not to be overwhelmed with all the info I'll be posting up about the Calico Toile and fitting. It will be new for some of you and I'll be taking you out of your comfort zone but by the end of the SEW-A-LONG you will have more skills in your sewing tool kit. And that's my mission!
Ok, let's get to it!
Here's What You'll Achieve Today
- How to Measure Yourself Correctly
- Deciding on What Size to Use
- Cut & Sew Your Toile
How to Measure Yourself Correctly
It's important to measure yourself correctly right from the start - when you have your correct measurements there is less room for error.
Step 1 - measure yourself and write down those measurements on the PDF provided.
- make sure you wear the best bra you have when measuring yourself as it does make a difference in measurement.
- to make life a bit easier I've got a 'How to Measure Yourself' Form and Guide. You can download it HERE.
Step 1 - measure yourself and write down those measurements on the PDF provided.
How to Decide What Size to Use
Ok, now that you've done all your measurements:
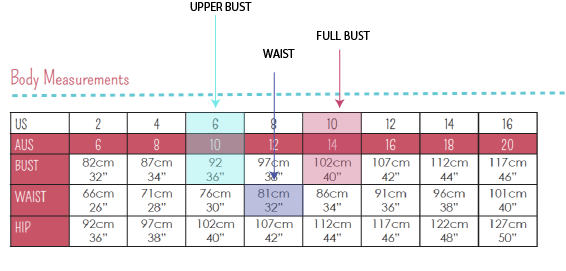
Step 2 - Compare your Upper Bust measurement with the Bust measurement of the pattern in the Body Measurement section.
So, let's just say:
As the difference between the Upper Bust and the Full Bust is 10cm/4" I'll be doing a FBA of 5cm/2" on the front pattern piece.
In the pattern instructions (on page 9) I explain how to print out only the size you want OR you can just print out all the sizes and work from there. Either way is ok.
Step 2 - Compare your Upper Bust measurement with the Bust measurement of the pattern in the Body Measurement section.
So, let's just say:
- Your Upper Bust measures 92cm/36"
- Your Full Bust measures 102/40"
- Your Waist measures 81cm/32"
As the difference between the Upper Bust and the Full Bust is 10cm/4" I'll be doing a FBA of 5cm/2" on the front pattern piece.
In the pattern instructions (on page 9) I explain how to print out only the size you want OR you can just print out all the sizes and work from there. Either way is ok.
So, for you, determine your pattern size and print the 2 patterns that relate to your Upper Bust and your Waist.
How to Alter Your Pattern for a FBA
Step 3 - Now that you have your front bodice pattern printed out it's time to do your FBA (Full Bust Adjustment).
NOTE: Keep all 3 necklines on your pattern ie. Boat, Scoop & V.
NOTE: Keep all 3 necklines on your pattern ie. Boat, Scoop & V.

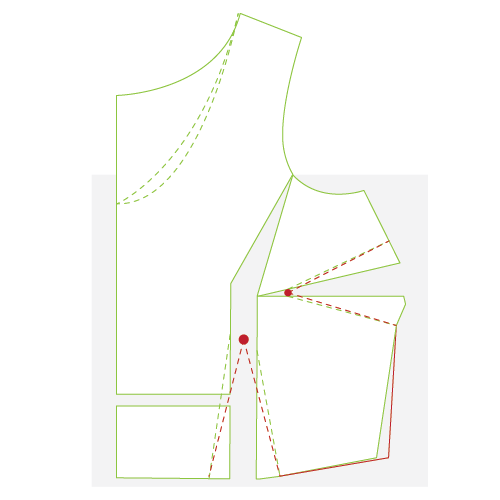
Step 4 - For this tutorial I'm ruling a line out to the Size 12 waist point as I need to have a Size 12 waist.
Step 5 - Rule Line A parallel to the CF and through the waist bust dart point.
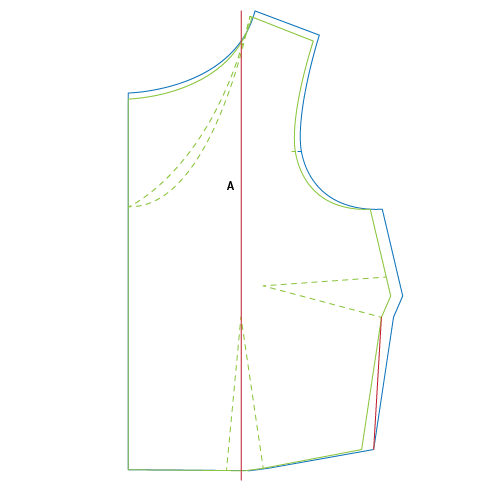
Step 6 - Get your 'Shoulder to Nipple' measurement and measure down on your pattern starting at the 1cm stitching line at the shoulder and ending at Line A. Now rule Line B at that point at right angles to the CF.

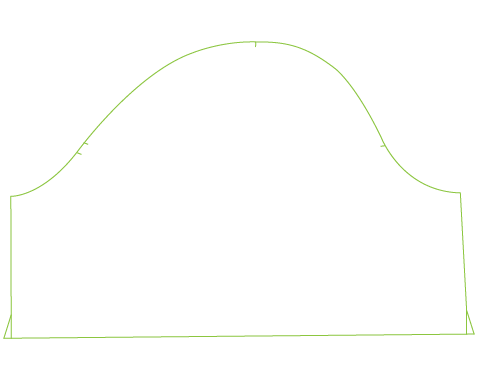
Step 7 - Rule Line C from the bust/nipple point to the armhole, just below the the notch. And Rule Line D, half way between the bottom of the waist dart and the top of the waist dart, at right angles to the CF.
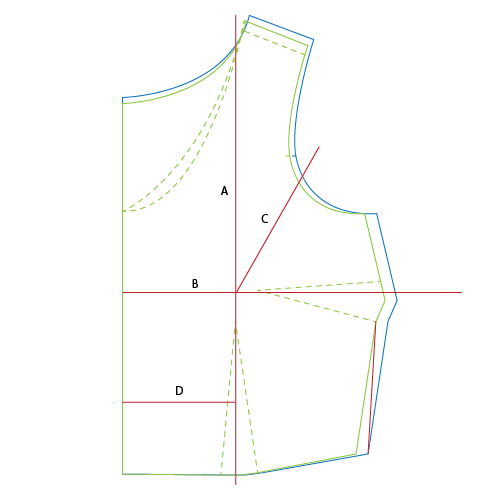
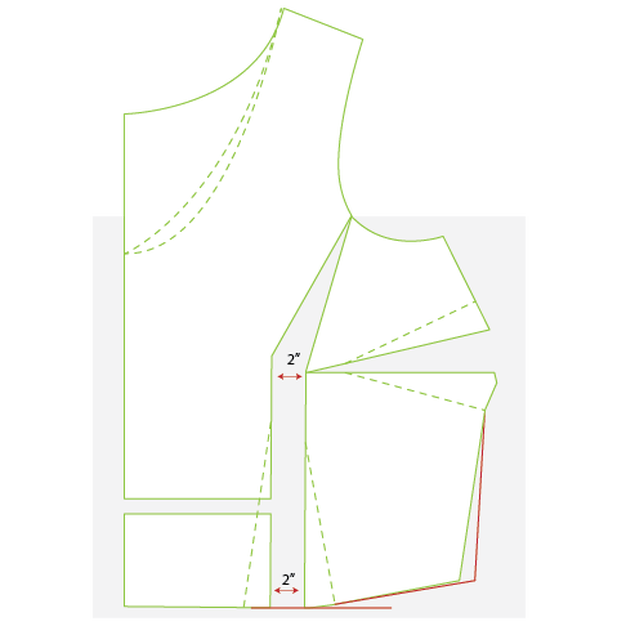
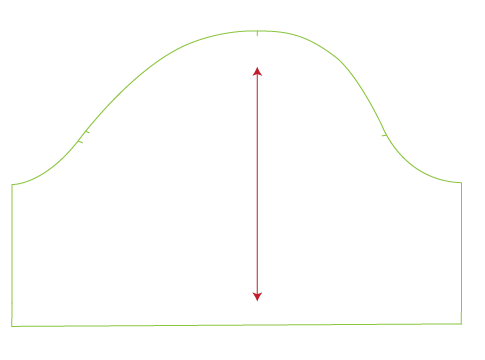
Step 8 - The image below shows you the lines (in red) that we'll be cutting.
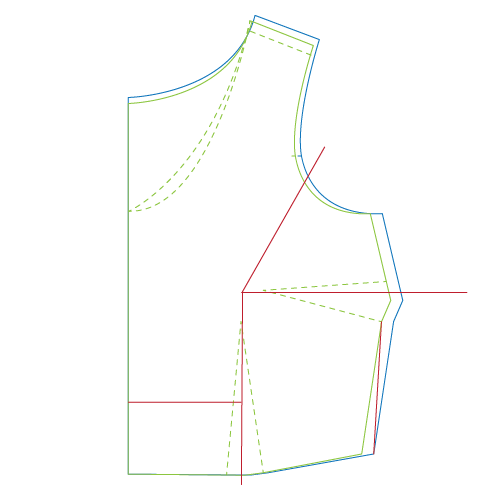
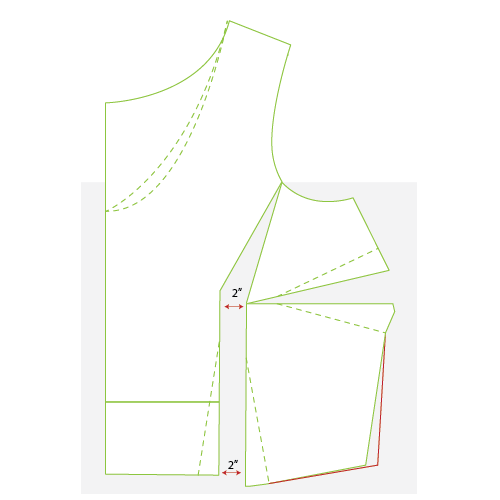
Step 9 - First, cut the vertical line from the waist to the armhole and then the bust dart line and pivot out the measurement you need to spread the bodice by. For this tutorial I'll be spreading the bodice 5cm/2" as I need, all up, the bodice to be 10cm/4" bigger at the bust line.
NOTE: having trouble? Pop over to the FB group for help.
NOTE: having trouble? Pop over to the FB group for help.
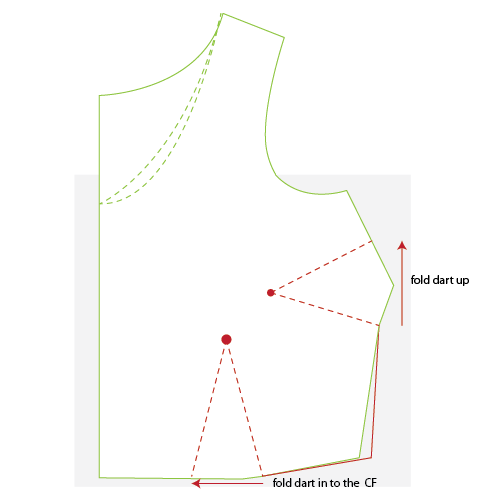
Step 10 - NOTE: For the purpose of this tutorial I've erased the Size 12 pattern lines so you don't get confused with too many lines.
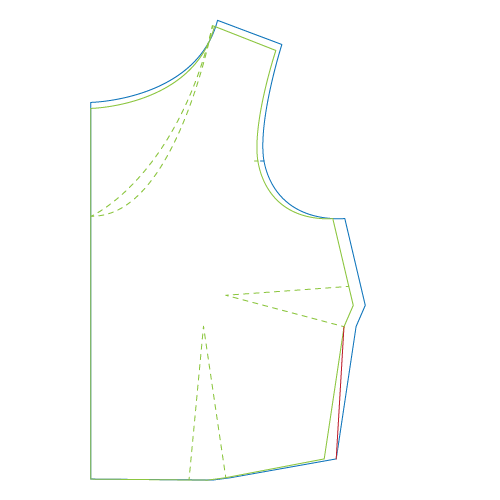
Once you've spread the pattern the desired amount you'll need to level off the CF bottom piece. Move the piece down so it lines up with the outer side piece.
You're pattern should look something like the image below.
Once you've spread the pattern the desired amount you'll need to level off the CF bottom piece. Move the piece down so it lines up with the outer side piece.
You're pattern should look something like the image below.
Step 11 - Find the centre point of the waist dart and mark then re-draw in your waist dart.
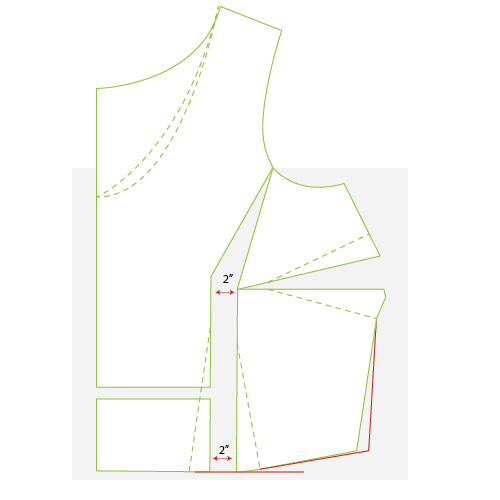
Step12 - All you need to do now is to 'true' your waist and side seams. Fold the waist dart to the CF and trace with a tracing wheel. Fold the side bust dart up and true up the side seam by drawing a line from the armhole/side seam point down to the waist/side seam point. Use a ruler for this.
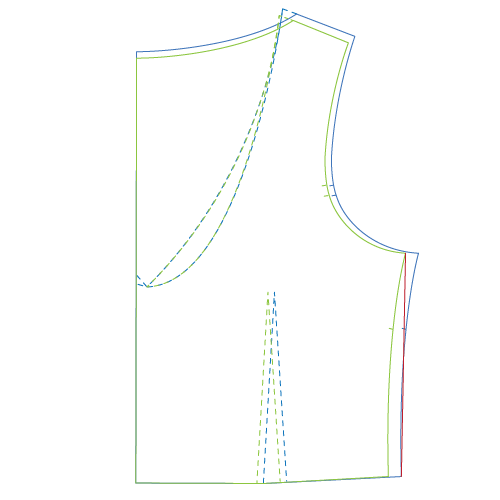
Step 13 - Now, we have to alter the back bodice pattern and you're done.
All you have to do is print out the same sizes as you did for the front and draw in a new side seam.
For this tutorial I just need to draw from the Size 10 armhole/side seam point down to the Size 12 waist/side seam point. That's it.
All you have to do is print out the same sizes as you did for the front and draw in a new side seam.
For this tutorial I just need to draw from the Size 10 armhole/side seam point down to the Size 12 waist/side seam point. That's it.
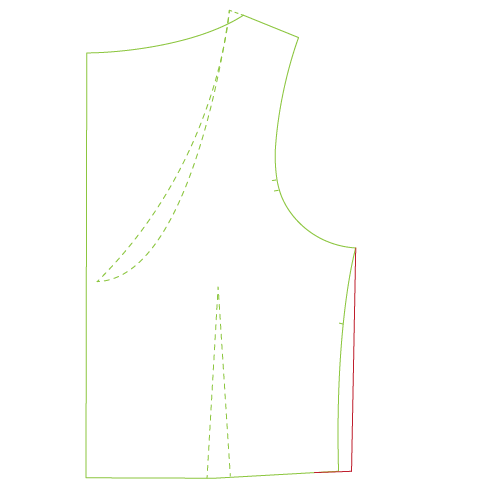
Step 14 - I've taken away the size 12 lines and I'm left with a size 10 bodice but the waist is increased to a size 12.
How to Alter Your Sleeve - if needed
If you've chosen a sleeved bodice then you'll need to do the following steps below. If you haven't chosen a sleeved bodice you are now ready to sew up your Toile.
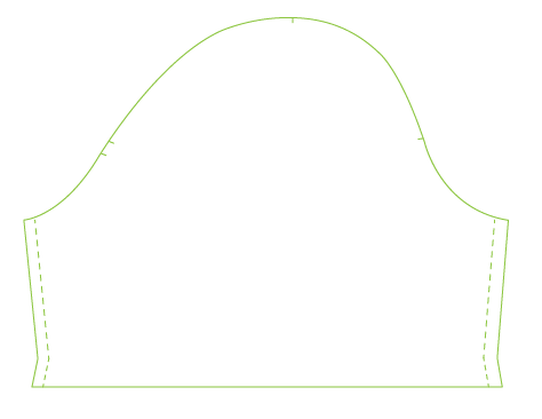
Step 15 - Print out the size that will match the Upper Bust size you printed for the bodice. For this tutorial I chose a Size 10/6 for my bodice so I'll print out a size 10/6 size sleeve.
Draw in your side seams.
Draw in your side seams.
Step 16 - Get your Top Arm measurement and add 2cm3/4" for ease.
Now measure the width of the sleeve half way between the hem and the armhole from seam to seam. Write that measurement down.
Is your top arm measurement bigger or smaller than the pattern measurement?
If it's smaller by 2cm then you're fine you can cut out your sleeve.
If the measurement is bigger than the sleeve pattern measurement then you'll need to do a Sleeve adjustment to your pattern. Follow on!
For this tutorial the Top Arm measurement is 36cm/14 1/4" + 2cm/3/4" (for ease) = 38cm/15". And the width of the sleeve is 33cm/13". So 38cm/15" - 33cm13" = 5cm2". I'll need to spread my pattern 5cm.

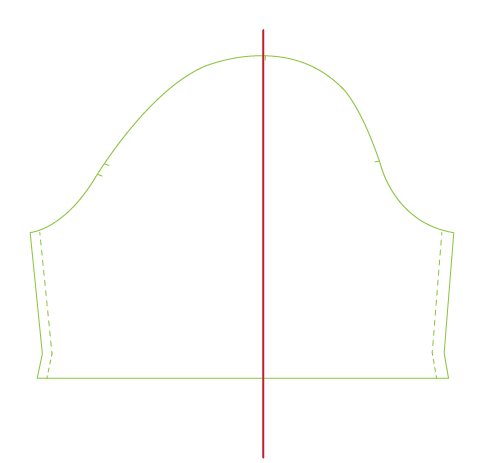
Step 17 - Rule a line down the sleeve through the sleeve head notch. This line is at right angles to the hem line.
Step 18 - Cut the sleeve on the line almost to the top. Leave about 5mm of the sleeve attached. Now spread your pattern at the hem the amount you calculated. Place a piece of paper under your pattern and tape it down.
For this tutorial I need to spread my pattern 5cm/2".
For this tutorial I need to spread my pattern 5cm/2".
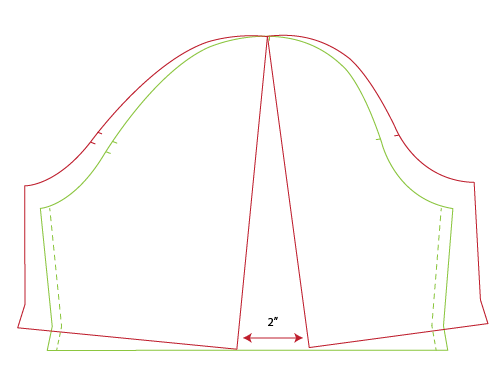
Step 19 - Redraw your hem line by ruling a straight line from one hem point to the other. Also, you'll need to recurve the sleeve head slightly.
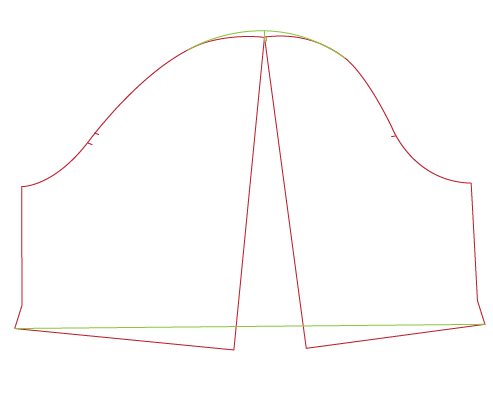
Step 20 - Now redraw your sleeve side seams - if they need it.
Step 21 - And finally, rule in your grainline and your sleeve head notch.
Cutting Your Toile
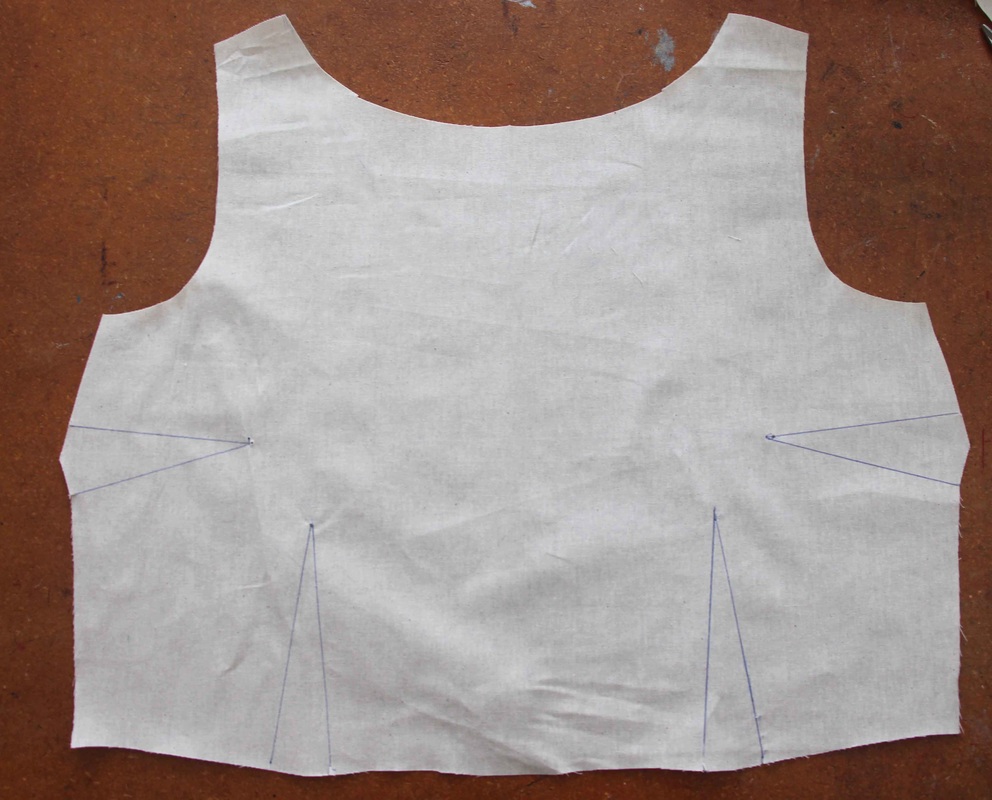
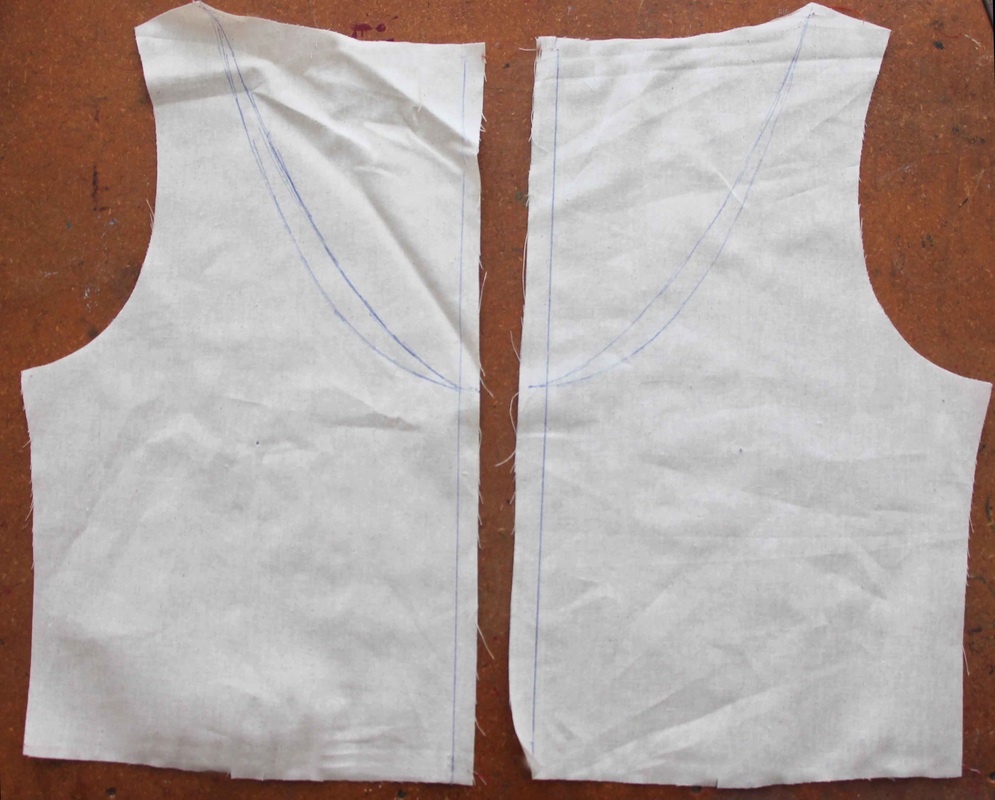
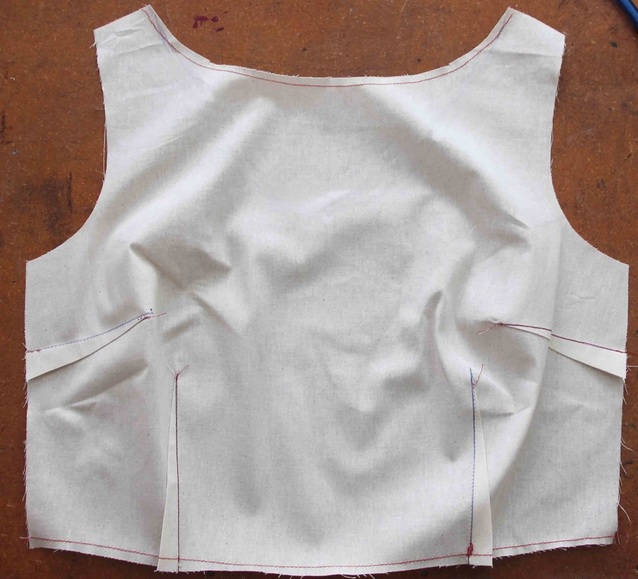
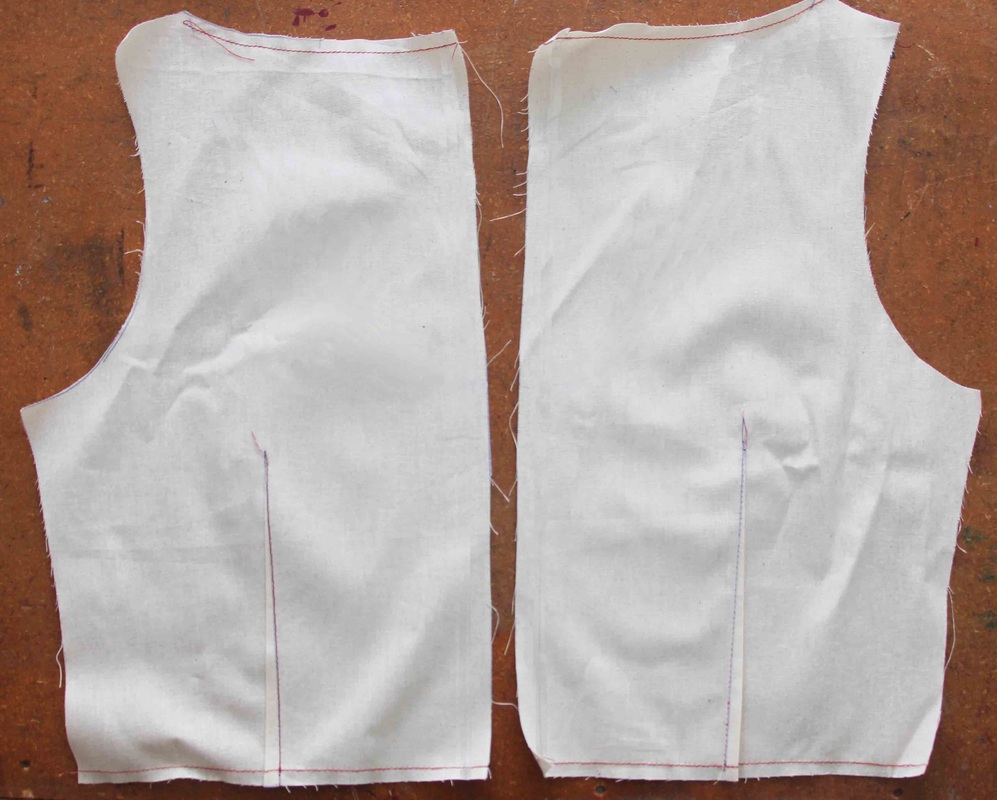
Step 22 - Cut the front bodice on the fold and draw in the bust and waist dart. Cut two back bodices and draw in the waist darts. I used a blue pen.

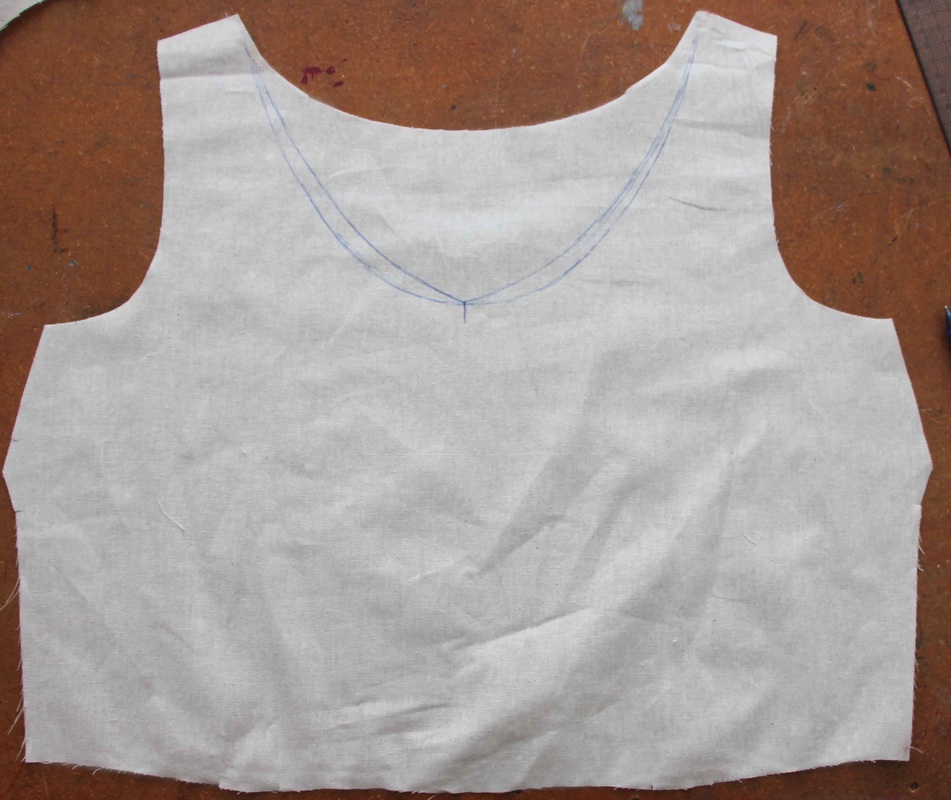
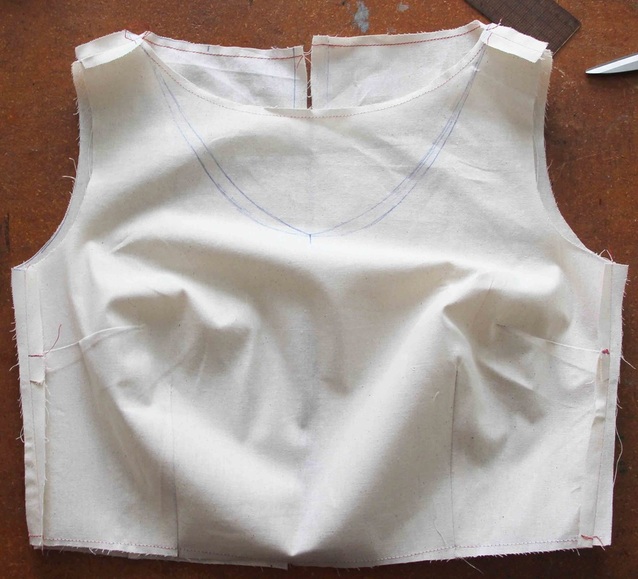
Step 23 - Turn your bodices over and mark in the Scoop and V necklines on the front and back pieces and also the CB lines on the back.
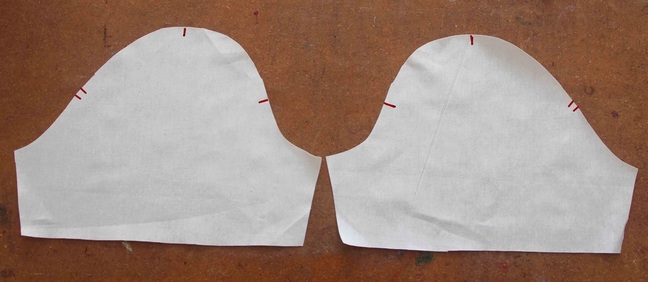
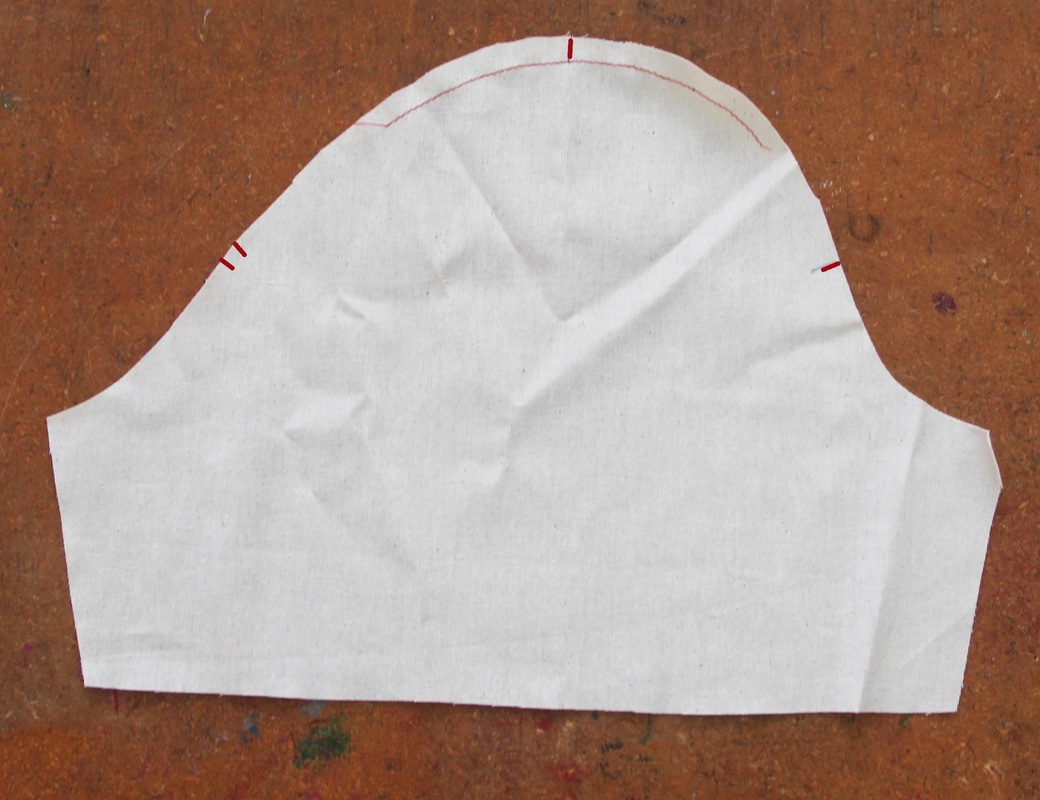
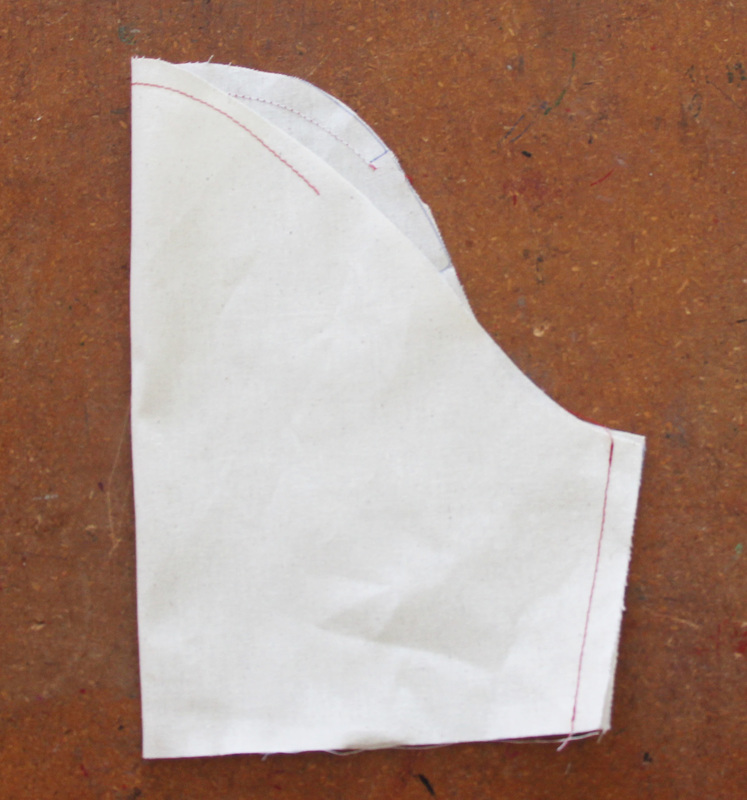
Step 24 - If you are sewing the sleeved style, cut out 1 pair of sleeves and mark in the front, back and sleeve head notches.
Sewing Your Toile
Step 25 - Once you've cut your Toile it's time to start sewing.
Sew a stay stitch 6mm/1/4" in from the edge on the following seams:
Sew a stay stitch 6mm/1/4" in from the edge on the following seams:
- front & back neckline
- front & back waistline
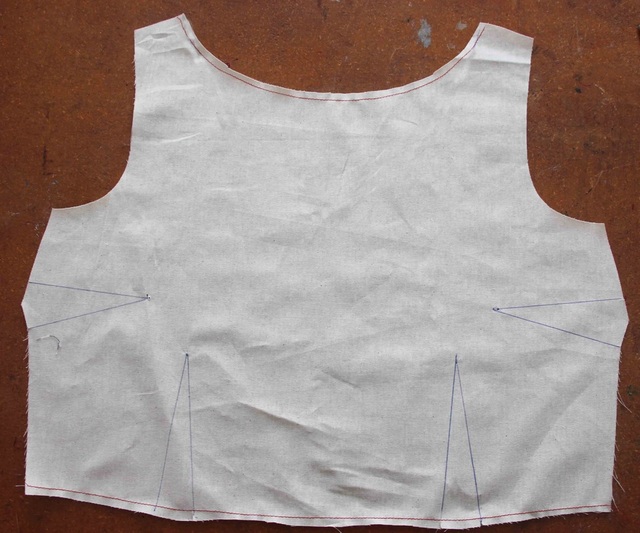
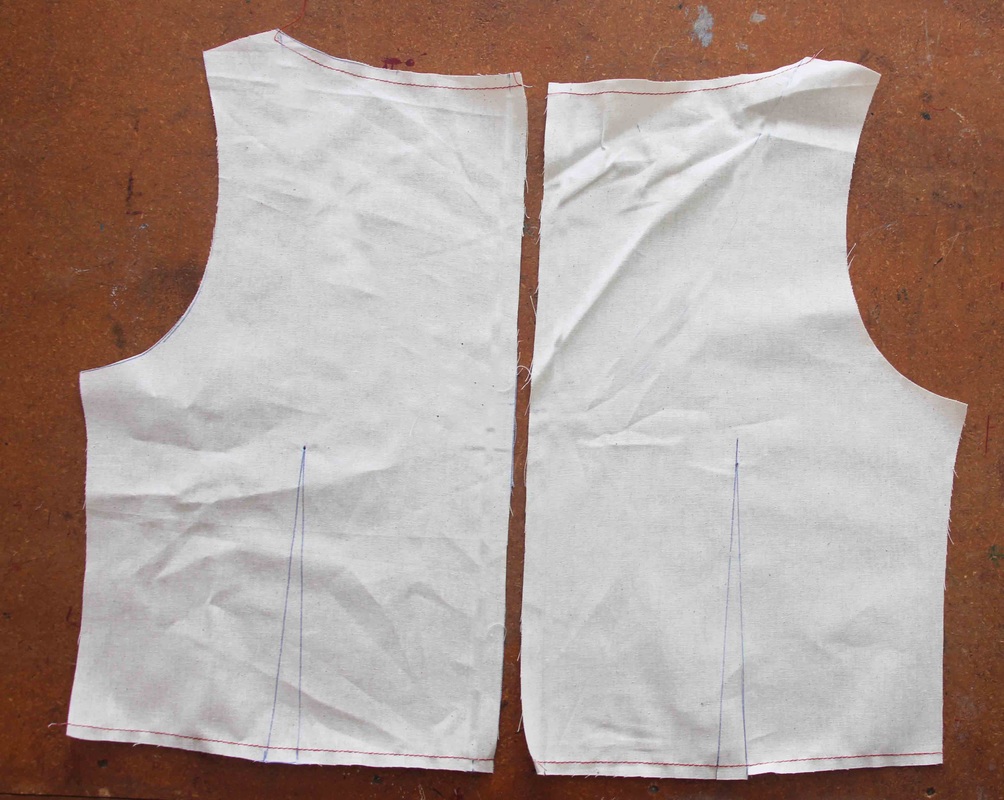
Step 26 - Sew the front bust darts and press the waist darts to the side seams and the side dart down to the waist. Stitch darts along the blue pen line.
Step 27 - Sew the back darts and press to the side seams.
Step 28 - Sew the shoulder seam and side seams with the WRONG SIDES TOGETHER. This makes it easier when fitting. Sew a 1cm/3/8" seam.
Attaching Your Sleeve
Step 29 - Sew a gathering stitch on the head of the sleeve.
Step 30 - With WRONG SIDE TOGETHER side the sleeve side seams 1cm/3/8".
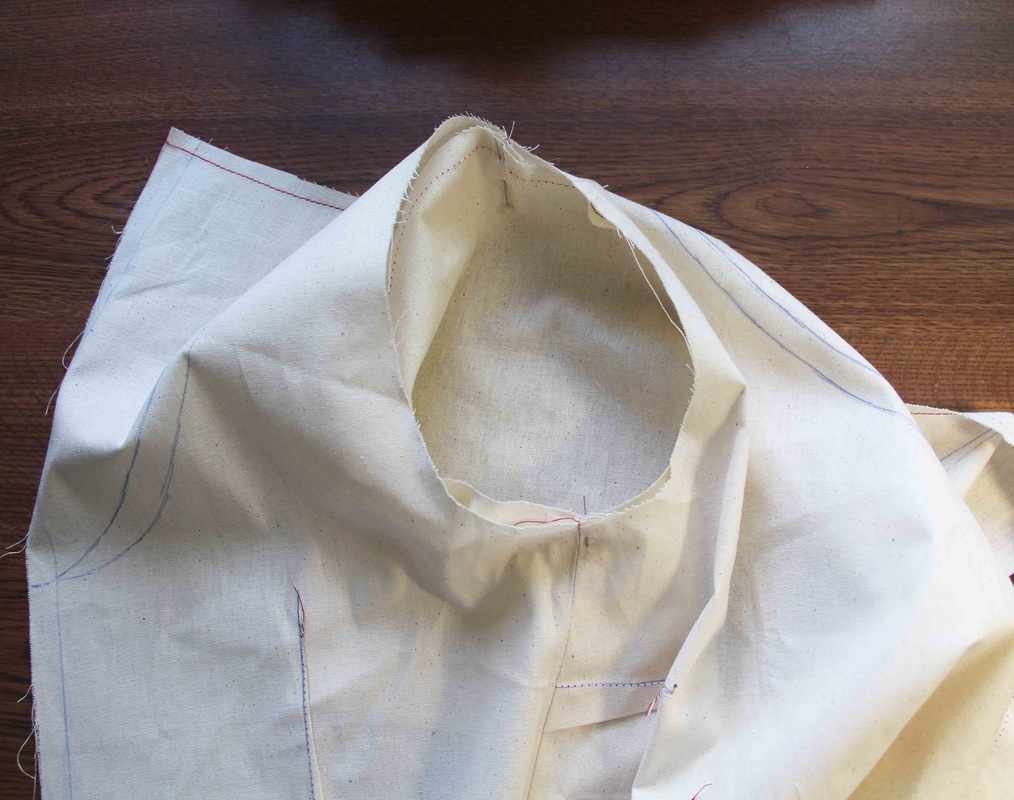
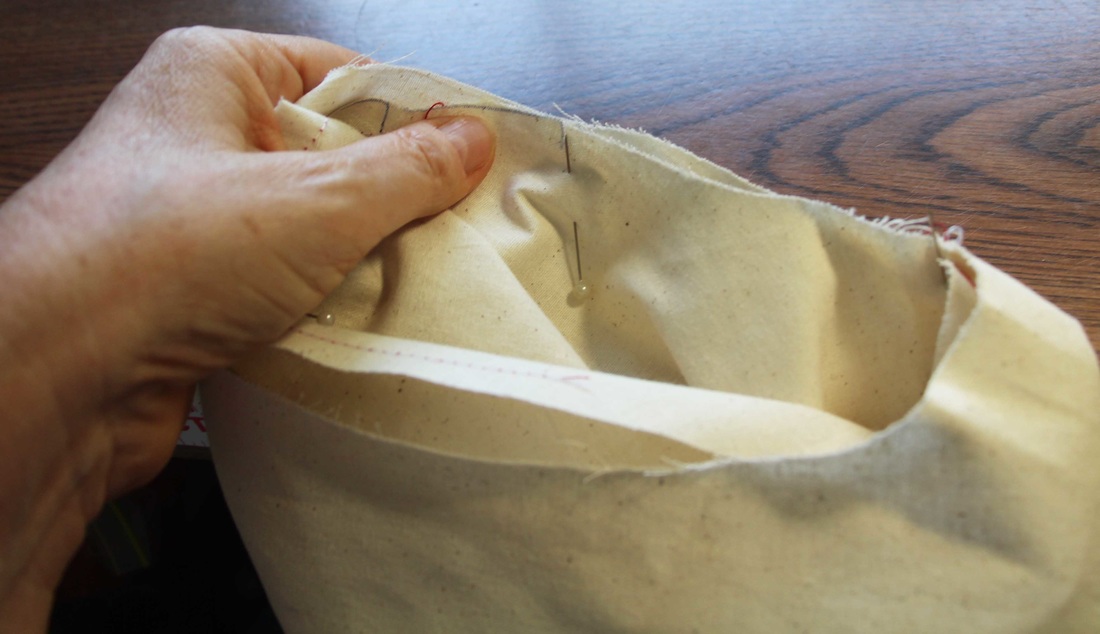
Step 31 - Place the right sides of the sleeve side seam to the right side of the bodice armhole/side seam and pin. Then pin the sleeve head notch with the shoulder seam. Match the front and back armhole notches and pin. Then pull the gathering stitch to ease the sleeve head into the armhole.
Stitch a 1cm/3/8" seam on the armhole and press the armhole seam toward the sleeve.
Stitch a 1cm/3/8" seam on the armhole and press the armhole seam toward the sleeve.
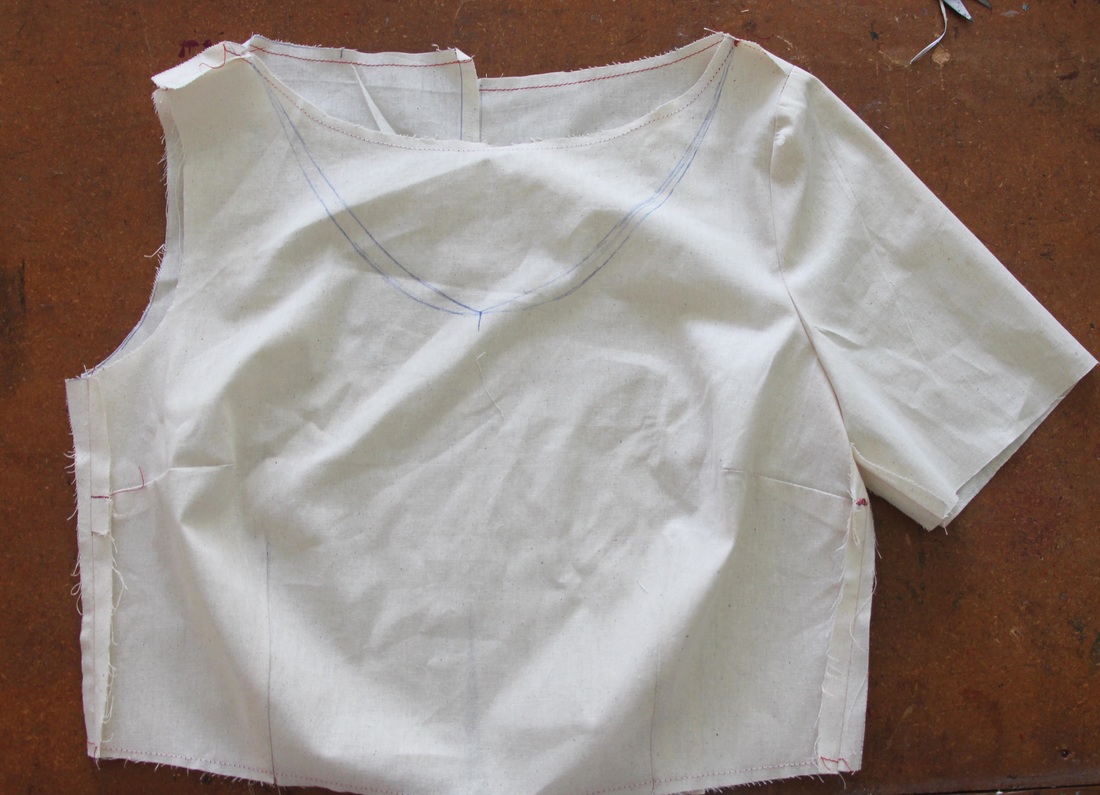
That's it for today
You've done really well - celebrate with a beverage of your choice. Your Toile is now ready for the Fitting stage.
In Lesson 2 you are going to fit your Calico Toile and nut out the fitting problems you might encounter. This lesson in particular will help you if you take photos of your Calico Toile on you and post it in the FB group so I can help you with any fitting issues you might be having.
In Lesson 2 you are going to fit your Calico Toile and nut out the fitting problems you might encounter. This lesson in particular will help you if you take photos of your Calico Toile on you and post it in the FB group so I can help you with any fitting issues you might be having.